A xenon HID (high-intensity discharge) projector beam headlight upgrade is a huge step up from the stock halogen systems found in most vehicles. While the task is time consuming, it is nowhere as difficult as it appears.
For the available kits for the X3; BMW X3
Note: Although the procedure shown here is specific to a 2006 BMW X3, the process followed is generally applicable to any vehicle, especially those steps where the headlights themselves are modified.
Tools: No specialty tools required. Tools will vary based on vehicle.
Time: 6 hours
Difficulty: Moderately hard (No step is actually all that bad, there is just a lot you need to do.)
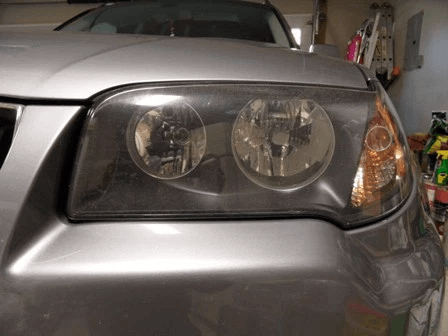
To say that the standard halogen headlights in our BMW X3 were horrible would be an understatement. The beams were weak and the light pattern produced dismal. On low beam, you would out drive the area illuminated, even when in town. On the highway, forget about it. Installing brighter halogen bulbs helped the light intensity a little but not the coverage area. A better solution was needed.
The X3 does not have a sales volume anywhere near some of the BMW sedans. As a result, no aftermarket headlights are available. Xenon projector beam headlights were an expensive option on the X3. Even used parts for these headlights are prohibitively expensive ($1000+ for used) and do not lend themselves to an easy retrofit.
You can purchase xenon bulb kits to install in the existing halogen reflector headlight assemblies, but these are considered dangerous – the super bright bulbs in an unfocused reflector can blind oncoming traffic and get you a ticket. The bulb kits are not cheap either – over $100 by the time you get done with all the parts needed. That’s a lot to spend for limited improvement that could get you in trouble with the police.
Xenon projector kits are the answer!
A retrofit kit that includes a xenon bulb within a projector beam housing provides the best solution. This setup replicates the same method used in a stock xenon projector beam headlamp at a much lower price. The end result is a set of headlights that look stock and illuminate significantly better than halogens.
Note: Projector beam headlights, particularly xenon, produce a much different illumination pattern than the reflector headlights on most vehicles. In particular, they are characterized by a distinct cutoff line. It takes getting used to. Some people do not like them. Look into it and make sure they fit your preferences before retrofitting, because it is a one way trip.
Installing a bi-xenon projector beam kit
I’ve broken up the following procedure into five sections, in an attempt to best serve both BMW X3 owners and the owners of other vehicles that might be using this procedure as a reference.
- Test and assemble projector units – this section is applicable to all vehicles.
- Remove BMW X3 headlights – this section is BMW X3 specific. You will need to perform a similar procedure for other vehicle types.
- Retrofit headlights with bi-xenon projector beam kit – while modification of BMW X3 headlights is shown, the process for other vehicle types would be very similar.
- Install BMW X3 headlights – this section is BMW X3 specific. You will need to perform a similar procedure for other vehicle types.
- Adjust headlights – this section is applicable to all vehicles (adjustment screw locations will vary).
Test and assemble projector units
Complete the following tasks to test and assemble the projector unit:
- Function of the retractable low beam shutters should be tested prior to installation to make sure they function properly. (You can skip this test if you are not hooking your projectors up for low-beam/high-beam operation.)Apply 12vdc to the two wires hanging from the projector unit. If operating correctly, you will hear the solenoid click and see the shutter move.
- Mount the shroud on the projector unit. These steps cover installation of the standard mini gatling gun shrouds on H1 style projectors. Other shrouds and projectors might mount differently.Note: Avoid handling the shrouds to prevent fingerprints. Using the bag they come in as a shield, as shown in the photos, works well.
- Align screw holes on shroud with projection unit and insert. You might need to wiggle things a bit to get the shroud to fully seat.
- Secure shroud with four Phillips-head screws.
- Align screw holes on shroud with projection unit and insert. You might need to wiggle things a bit to get the shroud to fully seat.
- Prepare projector assembly for installation.
- Remove the bulb mounting clip from the rear of the projector assembly by removing three Phillips-head screws. Save the screws and bulb mounting clip for later use.
 srcset="https://blog.retrofitlab.com/wp-content/uploads/2016/07/bmw-x3-bi-xenon-retrofit-06.png 448w, https://blog.retrofitlab.com/wp-content/uploads/2016/07/bmw-x3-bi-xenon-retrofit-06-300x225.png 300w" sizes="(max-width: 448px) 100vw, 448px" />
 - Remove the projector nut from the rear of the projector assembly. Save the nut for later use.

- Install the silicon gasket on the rear of the projector assembly. The kit comes with two silicon gaskets. For the BMW X3, the smaller silicon gasket fit best. You can determine which silicon gasket is best for your application when you test fit the projector assembly.

- Remove the bulb mounting clip from the rear of the projector assembly by removing three Phillips-head screws. Save the screws and bulb mounting clip for later use.


Remove BMW X3 headlights
You will be tempted to try and remove the headlights without taking apart the entire front of the car. Take it from me, this is not possible. Save some time and follow the procedure, as given.
Note: This procedure is specific to a 2006 BMW X3 with the optional M Technic aerodynamic kit. The process for other vehicles will vary.
To remove the headlights from a BMW X3, complete the following steps (save all parts and hardware for later use):
- Remove trim from top of headlights. Working from one end to the other, press the release clips and pull the trim strip forward.

- Unsecure front inner fenders. The procedure is the same for both sides.
- Remove two bottom inner fender hex-head bolts.

- Remove two front inner fender hex-head bolts.

- Remove rear inner fender hex-head bolt.

- Remove upper inner fender hex-head bolt.

- Using a flat-blade screwdriver, pop the inner fender loose from the front fender edge and pull the inner fender backward.

- Remove two bottom inner fender hex-head bolts.
- Remove four Torx-head bolts and lift out air duct cover.

- Disconnect electrical connectors from fog lights. Connectors are accessed from behind bumper (pull back inner fender covers to access from wheel well).
- Remove front bumper cover:
- Remove two Torx-head bolts (one per side) securing bumper cover to fender.

- Remove two Torx-head bolts (one per side) securing lower front of bumper cover. These screws are behind the black trim pieces surrounding the fog lights. The trim pieces are held in by clips that are more easily released from behind (pull back inner fender covers to access from wheel well).

- Remove three bottom hex-head bolts (two shown, below) securing lower front of bumper cover.

- Loosen center Torx-head bolt securing top of bumper cover. Loosen and remove two outer Torx-head bolts securing top of bumper cover. Do not remove center bolt, or bumper cover will fall when side clips are disengaged. (I learned this the hard way…)

- Reaching inside inner fender, pull outward on ends of bumper cover to disengage mounting clips. Carefully apply firm, non-jerking pressure outward from back side of cover. There are two clips on each side – release the rear one first. Use care, the replacement clips are about $50 each.Repeat process for other side of car.
- Bumper cover should now be loose. While holding it in place, remove the center Torx-head bolt securing top of bumper cover. Slide bumper cover forward to remove.
- Remove two Torx-head bolts (one per side) securing bumper cover to fender.
- Remove four hex-head bolts securing each headlight support. When bolts are removed, the headlight support will move freely while still attached to car.

- Disconnect electrical connector from rear of each headlight. Pull upward on the connector cover will cause the connector to move backward and disengage.

- Remove two rear Torx-head screws securing headlight.

- Remove two front Torx-head screws securing headlight.

- Slide headlight forward to remove. Some wiggling might be required.


The fully disassembled X3 front end is a bit scary!
Retrofit headlights with bi-xenon projector beam kit
Note: Procedure for BMW X3 headlights is shown. The process for your vehicle will vary slightly.
To retrofit headlights with bi-xenon projectors, complete the following steps after removing the headlights from your vehicle.
Note: Avoid handling headlight reflectors and projector shrouds to prevent fingerprints. If you touch the glass on any of the halogen or xenon bulbs, clean thoroughly with alcohol wipes to avoid premature bulb failure.
- Remove rear covers and turn-signal bulb from headlight assembly.

- Disconnect connectors from low and high beam bulbs. Release clips and remove bulbs from headlight assembly.
- Remove two Torx-head screws securing front and back halves of headlight assembly. Save screws for later use.

Note: While the whole headlight baking idea filled me with terror, it ended up being the easiest part of the entire job! Once the heat softens the glue, it’s really easy! - Place headlight assembly on baking sheet (cover sheet with foil if you intend to bake food on it again). Bake headlight assembly in preheated oven for 5 minutes at 250-degrees F. Make sure you use baking sheet and do not allow headlight to touch inside of oven to prevent melting. Do not use convection heating. Do not leave headlight in oven for more than indicated time. Use gloves.

- Using a flat-bladed screwdriver, use a twisting motion to carefully spread headlight halves apart. Work your way slowly around the perimeter, making multiple passes. Pull up on retaining clips to allow the halves to move apart.Don’t force it, these headlights are expensive to replace!

- When the halves are loosened up, grab each half and pull them apart. Work your way around, until the halves are fully separated. Lie front lens, exterior side up to keep dust out of it, in a safe place.

- Straighten halogen shield clips on back side of low beam reflector; then, remove halogen shield from front side of low beam reflector. The halogen shield can be discarded.

- Using small flat-bladed screwdriver, unclip and remove halogen bulb retainer from back side of low beam reflector. The halogen bulb retainer can be discarded.

- Test fit projector assembly in low beam reflector. The projector assembly must be installed with solenoid and shield at bottom – the projector assembly is marked for correct installation. (The projector lens flips the projection pattern.) Evaluate which silicon gasket to use during the test installation.

On the X3, the projector does not fit. The halogen shield mount is in the way.
- Grind halogen shield (or any other obstruction) until it is flush with reflector.

When finished grinding, carefully remove dust from reflector.
- Feed shield solenoid wires from projector assembly through hole in low beam reflector where halogen shield was mounted.

- Insert projector assembly in low beam reflector. Make sure it is oriented correctly. You will need to hold the projector in place until it is secured.

- Install projector alignment clip on back of projector assembly. The alignment clip needs to line up with notches on both projector assembly and reflector.

- Install projector nut on back of projector assembly. Be careful not to cross-tread the nut, as the projector assembly is soft plastic. Make nut finger tight, then tighten using needle nose pliers. continually check projector alignment (horizontal, vertical, rotational) throughout tightening process. Do not over-tighten.It is very important that the projector unit is aligned to match the high beam in the up/down direction. If it is not, it will not be possible to aim the low and high beams together.

- Install bulb retainer on back of projector assembly. Tabs point toward back of headlight assembly. Secure with three Phillip-head screws. Do not over-tighten.

- Align front and rear halves of headlight assembly. Press halves gently together. Ensure that glue is somewhat evenly placed before pressing halves together.

- Place headlight assembly on baking sheet (cover sheet with foil if you intend to bake food on it again). Bake headlight assembly in preheated oven for 5 minutes at 250-degrees F. Make sure you use baking sheet and do not allow headlight to touch inside of oven to prevent melting. Do not use convection heating. Do not leave headlight in oven for more than indicated time. Use gloves.
- Squeeze headlight halves together with your hands. Work your way around, until the halves are fairly well seated. Pull up on retaining clips to allow the halves to move together.

- Using a pliers, carefully squeeze headlight halves together until they are fully seated. Work your way slowly around the perimeter, making multiple passes.Have patience and do not force it, these headlights are expensive to replace!

- Replace two Torx-head screws securing front and back halves of headlight assembly.
- Take a break. Allow headlight to cool and glue to harden.
- Remove xenon bulb from packaging. Do not touch glass! Clean bulb glass with alcohol wipe and insert into rear of projector assembly. Bulb is keyed and can only be inserted one way.

- Secure xenon bulb with bulb clip (stiff wire “U”). Clip is inserted so the bow is inward, toward the projector assembly. Insert ends of clip into holes on top side of bulb retainer. Press clip firmly and work it into the hooks on the bottom side of the bulb retainer.

- Determine mounting location for the ballast and how you will route wires. For the BMW X3, the headlight housing is sealed and has sufficient room inside to mount the ballast. This made for a cleaner install that was weatherproof. If you are not mounting your ballast inside the headlight housing, the order of the following steps might change and some steps might need to be performed after installing the headlight housing in your vehicle.
- Install ballast in headlight housing. I mounted mine at the bottom of the housing, secured with heavy-duty double-stick automotive foam trim tape.
Affix trim tape to ballast.
Maneuver ballast into headlight assembly and press in place. Hold until securely bonded.
Ballast installed.
- Assemble connector for projector shutter. Place small rubber gasket on each wire. Insert connector pins into holes on back of connector shell, making sure their shape aligns with holes. Pull pins forward from inside connector shell with needle nose pliers to seat. Use firm but even pressure. Do not force! When properly seated, you can press gently back on each pin and they will remain in place. Press rubber gaskets into holes on back of connector shell.

- Install halogen high-beam bulb into halogen reflector. Make sure it is correctly oriented (bulb is keyed) and fully seated. If you have touched the glass on the halogen bulb, clean it with a alcohol wipe.
- Connect shutter connector to high-beam splitter harness. Make sure pins are straight before making connection. If they are not aligned, straighten them with needle nose pliers. When pins are correctly aligned, the connectors will slide together easily with no binding.

Shutter connected to high-beam splitter.
- Connect original BMW high-beam connector (female) in headlight assembly to male connector on high-beam splitter harness. Feed wired through headlight assembly and connect female connector on high-beam splitter harness to halogen high-beam bulb.

- Connect two xenon bulb connectors to ballast connectors.

- Connect CAN-BUS connector to ballast connector.

- Connect original BMW low-beam connector (female) in headlight assembly to male connector on CAN-BUS harness.

- Neatly tuck all wires into back of headlight assembly.

- Replace rear covers and turn-signal bulb in headlight assembly. Grey turn signal bulb socket is keyed. Insert socket into headlight assembly and turn bulb socket until it stops (about 1/4 turn) to secure.


Bulb retrofit is complete. Headlight assemblies are ready to re-install in vehicle.
Install BMW X3 headlights
Note: This procedure is specific to a 2006 BMW X3 with the optional M Technic aerodynamic kit. The process for your vehicle will vary.
To install the headlights in a BMW X3, complete the following steps:
- Slide headlight into location on vehicle. Some wiggling might be required.

- Connect electrical connector to rear of each headlight. Pull upward on the connector cover and align pins; then, push down on the connector cover. This will cause the connector to move forward and engage.

- Test headlight function, making sure that low beams, high beams, and daytime running lights (if applicable) operate correctly.

Note: The kit provided by The Retrofit Source includes a pigtail connector to allow full testing prior to assembly. Since their products are fully tested prior to shipment, I decided to test after assembly, but before mounting the retrofitted headlights. Projector shutter testing should be performed, as listed in the procedure, before projector installation. - Position headlights in their approximate position before securing. All screw holes should line up.

- Install two front Torx-head screws securing headlight finger tight.

- Install two rear Torx-head screws securing headlight and tighten.

- Align marks on front Torx-head screw washers with indentations on headlight assembly from prior installation. Tighten front Torx-head screws.
- Secure each headlight support with four hex-head bolts.

- Install front bumper cover:
- Slide bumper cover in place. While holding it in position, install the center Torx-head bolt, finger tight, to prevent bumper cover from falling.

- Pull lower edge of bumper cover slightly forward. Align four tabs (two each side) in bumper cover with slots in headlight supports; then, slide bumper cover in place.

Make sure that all four bumper cover tabs are in the slots.
- Align ends of bumper cover with mounting clips on fender. Carefully apply firm, non-jerking pressure on bumper cover to engage clips. Tap with hand to fully seat. There are two clips on each side – engage the front one first.Use care, the replacement clips are about $50 each. Repeat process for other side of car.

- Install two Torx-head bolts (one per side) securing bumper cover to fender.

- Install three bottom hex-head bolts (two shown, below) securing lower front of bumper cover.

- Install two Torx-head bolts (one per side) securing lower front of bumper cover. These screws are behind the black trim pieces surrounding the fog lights.

- Align fog light trim clips with holes on bumper cover; then, press firmly on trim pieces at clip locations to seat. Seat inboard trim clips first and work outward.
- Install two outer Torx-head bolts securing top of bumper cover, finger tight. All three of the Torx-head bolts should be snug.

- Close hood and align bumper cover so that all gaps are consistent.

- Tighten three Torx-head bolts securing top of bumper cover.
- Slide bumper cover in place. While holding it in position, install the center Torx-head bolt, finger tight, to prevent bumper cover from falling.
- Connect electrical connectors to fog lights. Connectors are accessed from behind bumper (pull back inner fender covers to access from wheel well).
- Secure front inner fenders. The procedure is the same for both sides.
- Pop the inner fender into front fender edge.

- Install upper inner fender hex-head bolt.

- Install rear inner fender hex-head bolt.

- Install two front inner fender hex-head bolts.

- Install two bottom inner fender hex-head bolts.

- Pop the inner fender into front fender edge.
- Position air duct cover and secure with four Torx-head bolts.

- Install trim on top of headlights. Align clips; then, press into place, working from one end to the other.


Headlight installation is complete!
Adjust headlights
When properly installed, the projector units seat inside the low beam reflectors of your old headlights should be in very close alignment with the original headlights. We also attempted to install the headlights in the vehicle in a near original position. With luck, minimal adjustment will be required.
Projector beam headlights are characterized by a pattern that has a distinct upper cutoff. You might need to adjust the pattern so that the upper edge does not blind oncoming traffic while illuminating the proper distance in front of your vehicle.
Note: Some municipalities require that headlights be aimed by a professional. Please consider local laws before aiming your own headlights.
Most headlights are aimed using two screws, one controlling up/down and the other right/left alignment. Use care when moving the screws! If you force them, they can easily break ruining your headlight! A little goes a long way when adjusting headlights, so make your changes in small increments.
The adjustment screws for a 2006 BMW X3 are shown below. The outer screw controls left/right alignment. The inner screw controls up/down alignment.
If you are unable to get the headlight illumination pattern in the right place using the adjustment screws, some additional movement can be attained by loosening the two front Torx-head screws that secure the headlight and moving the entire headlight assembly slightly.
Source: quirkyuncle.com


Comments (0)